Friday 29 June 2012

Mini Patchwork Quilt Tutorial

I have been asked to do a little guide on how to make mini patchworks.  This is my first tutorial so it may be lacking lol.

Anyway to begin

Firstly decide what size quilt, patches and shape you want.  I would recommend for a beginner that you use a square patch rather than hexagonal as it gives you a nice straight edge at the end.

I usually use either 1cm squares or have now started using 1 inch squares which are a lot easier and quicker to work with, so we will use 1 inch squares for this.  You will need to decide how big your finished quilt will be.  With the larger patches I use 7 x 7 inches, or 9 by 9, but as 7 inches fits the width of the graph paper I would suggest you start with these.  

Visit this site  http://incompetech.com/graphpaper/   where you will be able to make and print your graph paper.  Just select the A4 and 1 inch in squares, then print it off.  If you want to do a rigid design you may want to run 2 sheets off, 1 to cut up and 1 to make your design on, I have to say I never bother with this as mine are always pretty random!


Anyway, once you've printed your graph paper, cut it into all the individual squares that you need.  Also make a cardboard template slightly bigger than one of the squares to use as a guide for the material squares which will be bigger than the paper patches.

Using the larger template begin to cut out the squares of fabric, they don't need to be 100% accurate as they will be folded over the paper patches so don't worry if they're not perfectly straight and square.

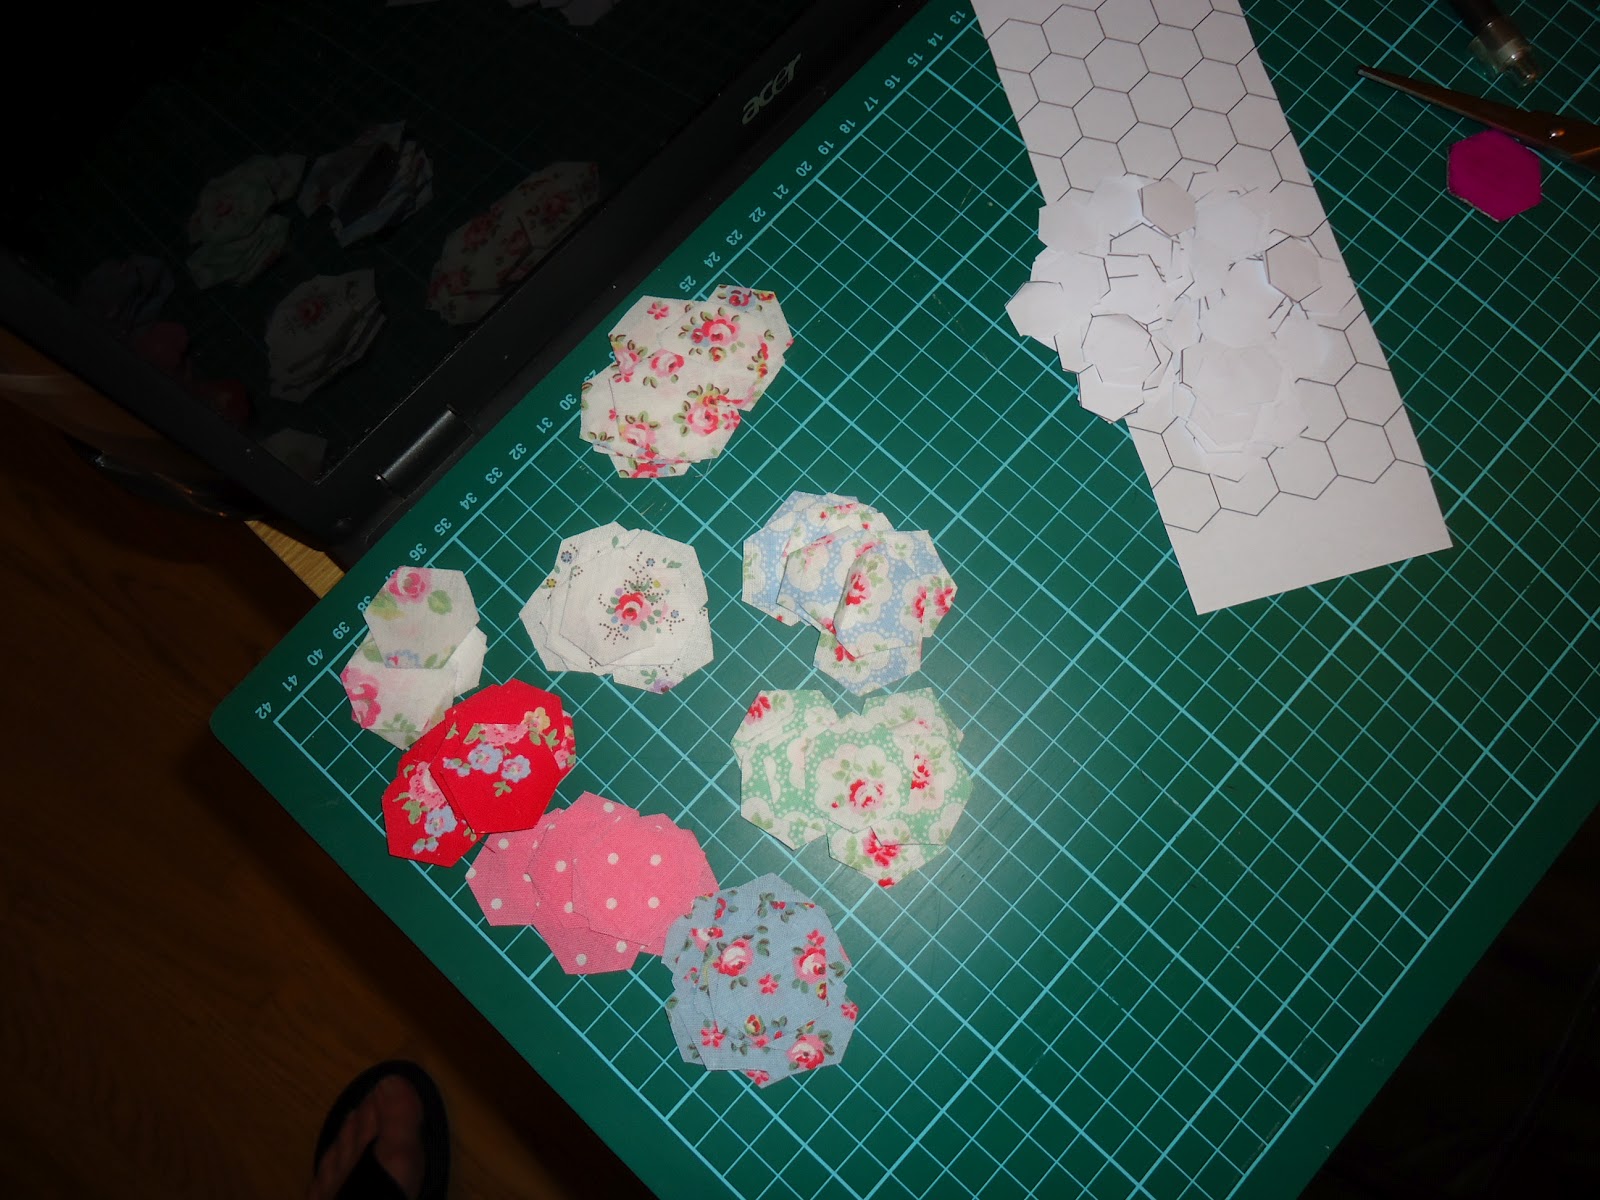
You will end up with a large pile of patches and papers


Next it's time to tack the papers and fabric together.  I know other people that use other methods which are quicker but I've never found them successful but that's probably just me, so feel free to try them.   One way is to spray starch the fabric and fold it over the patches.  Another way is to glue stick the paper patches and fold the fabric over.  I have to say they've never worked for me, so I go to the more laborious route of tacking!   Just roughly tack (with a completely different colour thread to make it easier when removing), folding over a small amount as you go.  They really do only need to be tacked with a few stitches, just to keep the corners down.


So now you should end up with a whole pile of tacked patches.  Now it's time to begin sewing them together.   Place 2 patches right sides together and using a colour thread that will blend in, begin oversewing on the very edge, trying not to sew the papers inside the patches, not easy and it isn't a disaster if you do catch the edge of the papers.  To start off just do a few oversewing stitches just to secure the thread, then work along the edge of the patch, try and get as many patches sewn together using the same thread, if you're doing a random patchwork you can get quite a few.  You can always do a couple of stitches back the other way to join another patch, just saves keep breaking the thread.  When you come near the end of the thread just do a couple of stitches together to secure it.


The quilt comes together quite quickly at this stage and you'll end up with patches together something like this


When you've got them all sewn together to the size you want, it's time to get the iron out!

Give the quilt a quick iron, just to reinforce the folded corners really.  Now it's time to take the tacking and papers out.  This is fiddly but persrvere!  It does make a mess with bits of cotton everywhere!  But the end is in sight.   When I've got the papers and tacking out I give it a very quick iron just to smooth it all out and keep those corners folded in.

You now have a nearly finished quilt!

To finish it, again there are many methods!  I don't use any wadding in mini quilts as it makes them a bit too stiff.   A very simple way is to just cut another piece of material the same size as your finished quilt and right sides together sew them together, just leaving enough room to turn it right side out and then ladder stitch the opening together.

The method I use, I found here.  Rather than writing it all again, just visit this blog.  It's for a full size quilt but it's exactly the same for a mini quilt, just easier and smaller!  Just adjust the amount of fabric needed for the turnover, you won't need much as the quilt is quite small.

http://prudentbaby.com/2011/11/by-craft/the-easiest-cheat-for-binding-a-quilt/

and also a quickie on invisible ladder stitch

http://turningturning.com/tutorial-invisible-ladder-stitch-for-quilt-binding/

This is the method I usually use on my mini quilts.   If you have used hexagons you will need to make sure that the edge is big enough to cover the spaces between the edge hexes.  Another way for hexagons is to applique them onto another piece of fabric and then use one of the methods to join it together.

Alternatively, you can also use the very pretty bias binding that is available or plain binding  to join the front and back together, again using an invisible ladder stitch.  You can make your own bias binding type edging as well just by cutting strips of material.

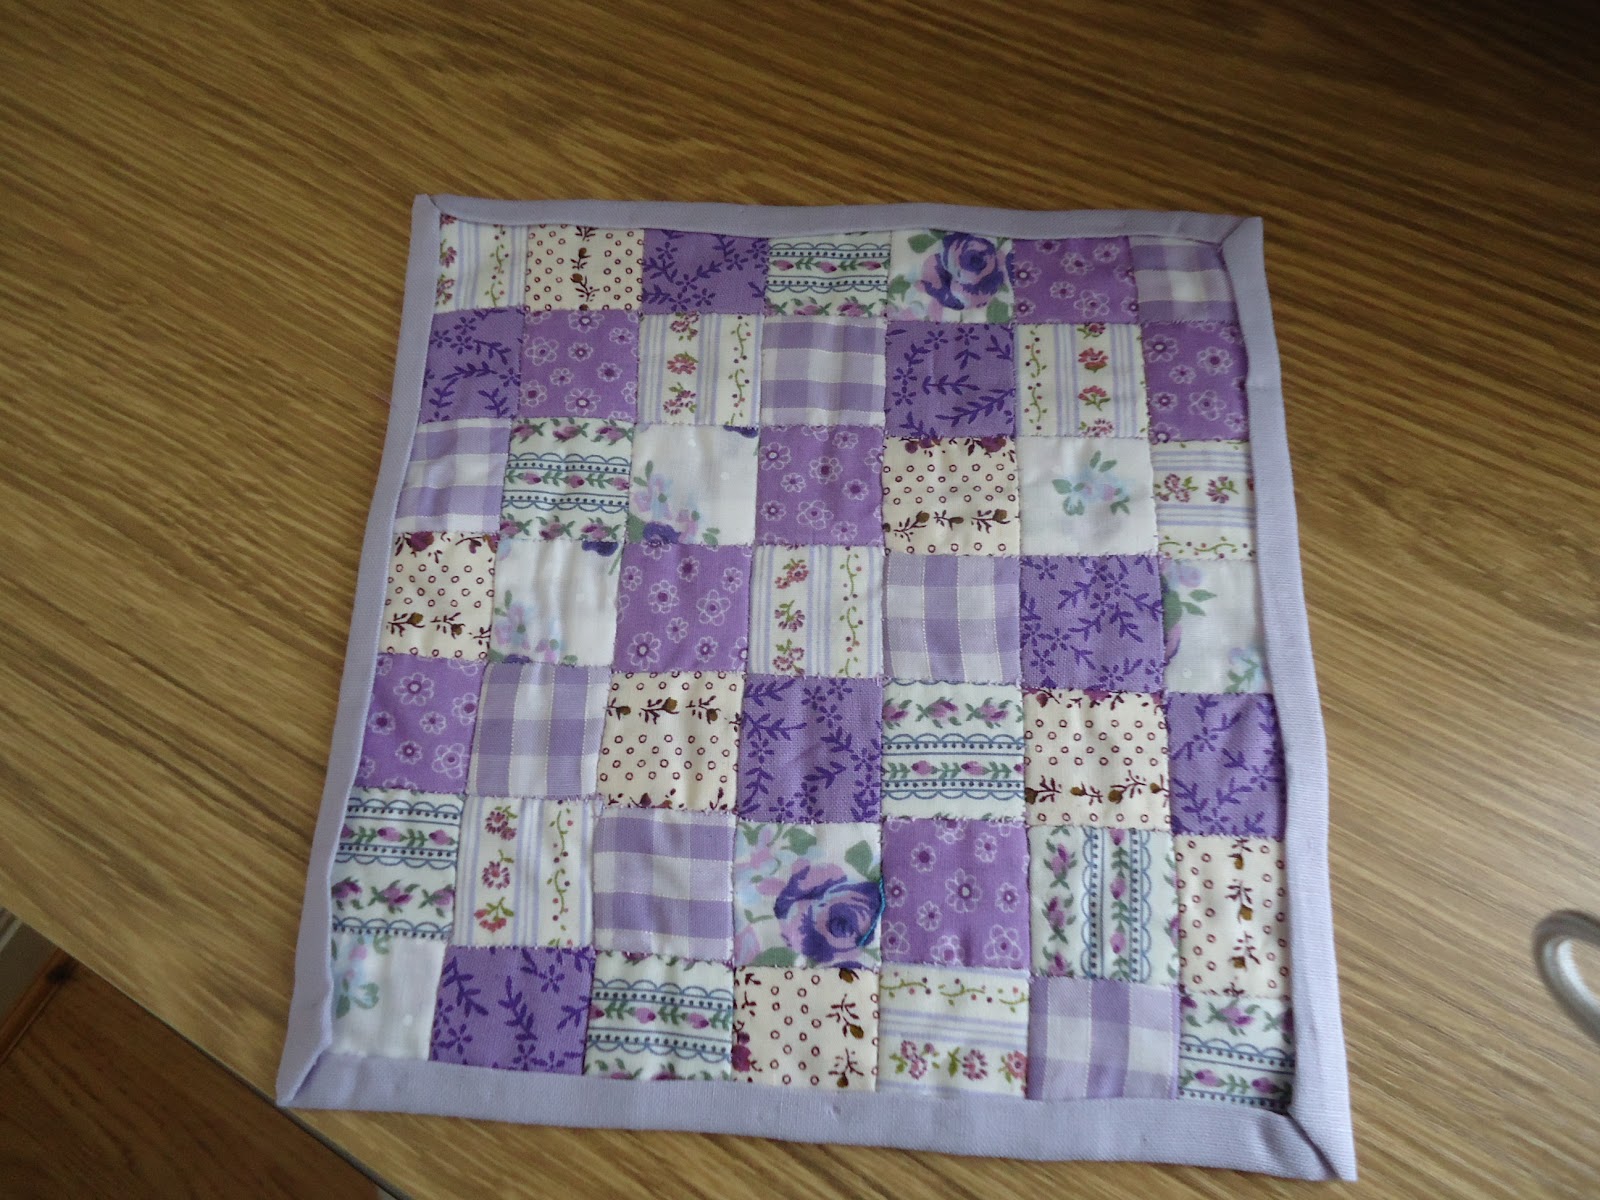
Anyway you should end up with a finished quilt  that looks a bit like this


Honestly it is a lot easier than it sounds, and once you've started you won't be able to stop!

Hope you find this guide helpful and feel free to ask questions or to suggest ways of improving it!  I'm a novice and not sure how it will work for you!

Monday 25 June 2012

Mini Quilt and Mini Knits

Have had a busy weekend knitting and patching!

Firstly made a few little baby dresses for my friend Sylvia, they're not for dollshouse babies, but for twin baby mice lol.

Then decided to have a go at making another patchwork quilt, but using bigger patches this time.  I still think it's a bit big, but it probably looks so different to the little tiny ones I do, I may get used to it.

Not really done that much else, have got a few bits and pieces to put around different places, but they've just sat in the box since Saturday, need to find my stash of beads etc., (and I can't think where i've put them lol) as well, got a few bits for Lobster's bedroom and a couple more bits for the shabby shop, but nothing terribly exciting, just bits and pieces really.

Anyway, here are the little dresses and the new quilt


Wednesday 20 June 2012

Time for Bed?

Nothing terribly exciting to blog about!  Oh my life is so boring sometimes!

Anyway, I would like a nice wicker armchair in the vast Lobster Pot Cottage bathroom (blames Paula again, her idea), I've not got the chair yet, but want to drape a nightie and maybe dressing gown over it as well so when the lady (whoever she may be) of the house has her bath before bed it's all waiting for her.  Well, was browsing ebay and couldn't find any I liked and a lot seemed to be extortionate prices as well, so decided to have a rummage in my lace box and see if I could make one.  Here is the result.  Not bad for a 1st attempt and am sure it will look better when it is hanging over the chair.


You can't really see properly in the pic, but the top half is a rich cream lace and the bottom half is white lace.  Hmm maybe it's a multi purpose outfit, could be a ballgown as well I suppose lol.

Monday 18 June 2012

Shabby Kitchen

Not dollshouse related as well, but thought I'd show you the top end of my kitchen which I painted forever ago, and bought all the bits and pieces for!   Well this morning finally got the shelf, etc. put up so thought I'd share a few pics of my new bits and pieces, finally in place!


As you can see my little shabby shop never made it onto the shelf!  It was a bit too big really and there just wasn't room!


But I found a home for it on top of the fridge!


So that's been my mornings work!

Tuesday 12 June 2012

Cove Cottage Tea Rooms

Well I'd forgotten I'd got these wonderful signs from the other Julie (cottagekitty) who does all the beautiful signs for Julie's houses.

I've put the little teapot sign on the porch for now as it covers where the Cove Cottage sign was, but when Carol brings me over the Cove Cottage sign that fell off, I shall move it to the front door.   I also got a lovely Pantry sign that I've put on the door at the back of the tea room, although it may change to the door in the kitchen.  They really are equisite I certainly could get addicted to these signs!

I've also put a couple of other pics up as I have added a few (not many) bits to the kitchen and also the bathroom on Lobster Pot


Monday 11 June 2012

Mini Patchwork Finished

Managed to finish the mini quilt today, no room for it so have stuck it on ebay lol.

Not really done much else mini-ing, added a few bits to Lobster but nothing startling so haven't taken any more pics as it would be more like spot the difference lol,

Have sortof come to a standstill at the moment, lack of funds mainly (sound familiar?) don't really need many "big" things, it's more bits and pieces, am going to get a chair and rug for the bathroom but not found anything that takes my fancy really.  Bathroom is filling up but it's still a vast space!  I need to learn how to make a few more things, i've tried fimo and I'm rubbish lol

Hope the weather's better here you all are, it's been chucking it down all day here and is still raining, can't believe they're still saying we've got a drought and there's a hosepipe ban, although you certainly wouldn't need to water the garden at the moment!


Here's the finished quilt

Wednesday 6 June 2012

Bit More "Stuff"

Have started a new Cath Kidston patchwork, still in the early stages but thought you might like a sneeky peek


I shall "infill" with probably a plain pink fabric, think I've gone a bit overboard with the patchwork hexes though and will end up making a double quilt and probably a cot quilt as well, I'm afraid I'm not a planner in my patchworking so end up with loads of patches than I actually need lol.  I shall sew them all together one day!


Got a few bits from ebay today and also done a bit of re-arranging of stuff, so thought I'd update the pics even though I only put them up yesterday lol

Shabby Shop (still nameless) and also has a new shopkeeper with funky pink hair!  Nameless as yet, but open to suggestions!  Few more bits and pieces in there now but I did pinch the other dresser!


Next is Lobster Pot Cottage, managed to fill the bathroom up a bit more!  Re-arranged the ground floor as well and added a chest and mirror to the bedroom.  Still no inhabitant though, not sure who lives there now!


Finally Cove Cottage.  Changed the tea rooms around and also changed the tables.  Upstairs got a few bits for the Kitchen Prep area, so it is beginning to take shape now.


Monday 4 June 2012

Cove Cottage

Hope everyone's having a lovely Jubilee Weekend.  We haven't done that much, I put some flags out but that's been about it.  Weather permitting we are going on a picnic with the local NAS Group, but have to say the weather forecast doesn't look too promising!

Anyway, I managed to have a little play with Cove Cottage yesterday.  Still a long way to go and waiting on a lot of furniture to arrive, but of course with the 4 day break it's delaying things somewhat!   Downstairs is now the Tea Rooms, shortly to be renamed Cove Cottage Tea Rooms, there's also one of the lovely Cottage Kitty's Cove Cottage plaque that goes on the porch, unfortunately it fell off, but Carol (who I got Cove Cottage from) will pop it over next time she's over this way.  Upstairs will be the prep area, but am still awaiting all the kitchen stuff so it's a bit bare up there, apart from the new nameless inhabitant!


Lobster Pot Cottage is now becoming a "normal" cottage!  I've moved the living room downstairs and it's now a kitchen/living room, the bedroom is on the 1st floor and there's now a spacious bathroom in the attic.  Again a lot more "stuff" is needed, a few bits are on their way, but still need more!   I also need a new inhabitant for that as well, now who will it be!


Now poor old Maggie in Driftwood Cottage is feeling a bit neglected, she hasn't had anything new at all, but she has managed to pinch her shelf back from Lobster!


Bill on the other hand is very pleased with his new cabinet that Paula sent him, it's perfect with all the ships on it.  He also got a gorgeous picture of Broadstairs (my favourite place in the whole world) so he's a very happy chap!


I still haven't got my shabby shop in my kitchen yet, in fact still not got my shelf or anything else come to think of it in my kitchen yet!   I have got a whole heap of little bits to put in the shop though, that's on my to do list which is ever growing!

I've also just started on a new Cath Kidston mini quilt, only in the 1st stages so far, just cut out the papers and that's as far as I've got!  Finished another tea cosy, not really done much "making" in last few weeks.  It is my intention to start on the knitted nativity sets ready for Christmas, although it was my intention to make them throughout the year, but have to say that hasn't happened!  I must get on with them though else I'll have none to sell and christmas will have been and gone!  I keep getting sidetracked with mini knits, mini quilts and tea cosies and iphone cosies!  I must be strict with myself!  I've still got a whole bag of cross stitch to do, which I've never started either!  All mini ones, but just haven't had the enthusiasm for them yet, hopefully it will come and I'll make a few!

Oh my I'm rambling again!  I better go!

Oh and Rebecca, yes I have caught Paula's bug!  I blame Paula for most things!

Friday 1 June 2012

Confession Time

Yes, Paula is right, I have a confession!  I've bought another of Julie's cottages.  I bought Cove Cottage from Carol who luckily lives very local to me!

The ground floor will become the Lobster Pot Tea Rooms, well Cove Cottage Tea Rooms when the signage is sorted, also just waiting for the usual little Cove Cottage plaque as it fell off at Carol's so she will drop it into me.   The upstairs will be where all the action is (well cooking action that is!), it's going to be a productive kitchen where all the cakes etc. are made for the Tea Rooms. 

Lobster Pot will become a "normal" house.  I shall have kitchen/living room on the ground floor, bedroom on 1st floor and bathroom in the attic room.  Will make a change to do a normal house!

I have to say I've been very tempted with Julie's new cottage, I have to keep my fingers from straying to the buy it now button lol.   I really don't have any more room though, Cove Cottage only just fits in!  It's sitting next to the outdoor area of Lobster which will still be the outside seating for the tea rooms, well I think so anyway.  Have bought a couple of outdoor street lamps as it's a bit dark down there sandwiched between the houses!  I might try Cove Cottage the other side of Lobster and do away with the outdoor seating area for the tea rooms and just have it as a little seating area for the residents of Lobster.  Not sure yet, got to try it out.  Hopefully will get it started this weekend and will then take some pics to show you.

That's it confession over!